Scientists have long known that visual cues play an important role in helping learners to retrieve and remember information. This makes sense, as the brain itself is essentially an image processing machine. In fact, some studies suggest that up to 90 percent of the information transmitted to the brain is visual. This extra brain power dedicated to visual information can have some big learning-related benefits, however. According to recent research, images are more likely to stick in long-term memory, are processed more quickly than text, and even improve comprehension and achievement. What’s more, not only do images help students to learn, they can also make them more interested and engaged during that learning, which is one of the biggest hurdles in ensuring that students are successful in your course.
Sounds great but how do you do it? After all, not every instructor working online is a graphic designer or artist with the ability to churn out amazing images, videos, infographics and social media posts. That’s where a great free tool like Canva can come in handy. Canva makes it simple for people of any ability to create a wide range of designs, from small images for Twitter to infographics to posters and flyers. If you’re not familiar with the site, get to know it here and learn why it can be a great tool for any educator to embrace.
An Introduction to Canva

Canva is a website that allows you to use pre-existing templates to quickly create graphics, simplifying the design process and allowing users to create high-quality images without needing specialized design software. In fact, photo editing is built into the design process, which can make it pretty easy to take even a raw image and make it into something you can actually use for your course.
Even better, the site is largely free, though you can choose to pay for additional images and bells and whistles, as is common with many web-based tools. Most users, at least those casually using the service, won’t need to make any purchases—there are a large number of images, illustrations, and fonts available to use at no cost.
Perhaps the best feature of the site, however, is its ease of use, as it’s designed to be functional for people of all levels of ability. Those with little to no design experience can use the integrated “design school” to watch tutorials and learn how to build better graphics. There’s also a stream of images that other users have created that can serve as inspiration for your own creations. But what if you’re already a design pro? The format is flexible enough that it won’t feel constraining to those who are used to flying solo—in fact, the site is incredibly popular among designers.
All of this sounds like a ringing endorsement for the site, but it’s not without drawbacks, though how much they matter to you will vary. First, the site is free, but only to a point. For example, you can create a presentation on Canva for free, but it will be limited to only 15 slides. Additionally, some users have reported difficulties in figuring out how to navigate the design menu or snags in getting their finished projects exported. If you aren’t a confident computer user already, you may find this off-putting, but keep in mind that customer support, only a click away on the site, may help remedy some of these issues quite quickly.
Using Canva: The Basics
Canva is designed so that even non-design professionals can use it, but watching a few tutorials, offered up by the site itself, can be a big help. To get you started, here’s a really basic overview of how to use the site.
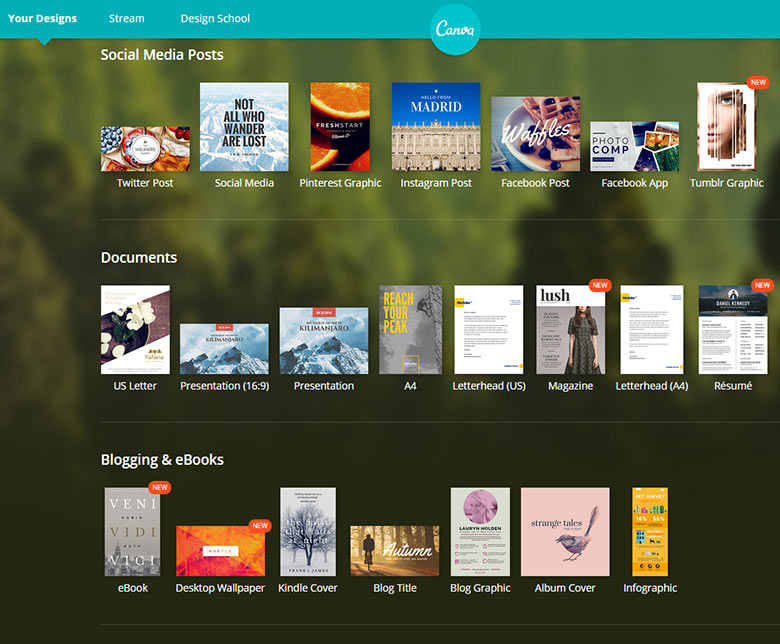
When you enter the site, you’ll be greeted with the option to choose what kind of design you want to create. Options include:
- Social Media Posts: These include image types optimized for Twitter, Pinterest, Instagram, Facebook and Tumblr.
- Documents: Select from U.S. letter, presentation, A4, desktop wallpaper, letterhead, magazine cover or resume.
- Blogging and eBooks: Create covers for Kindle books and albums or design blog headers, graphics and infographics. The featured image for this blog post was made in Canva.
- Marketing Materials: These might not be as essential in the classroom but there are nice options for posters, menus, business cards, flyers and more.
- Social Media and Email Headers: Enliven your course communication with headers for YouTube, Email, Twitter, Tumblr and a number of other social sites.
- Events: These templates can be useful for promoting campus events and let you easily build postcards, invitations and photo collages.
- Custom: At the top of the menu you can choose a custom size, an option that can be great for crafting an image that will fit an existing, non-standard size space in your course.
Once you’ve selected the type of graphic you want to create, you can choose from a wide range of pre-existing templates or make a design entirely on your own. You can bring in your own images using the upload tool on the left hand side of the screen (and edit them as well), or choose from a wide range of free images provided by Canva. You can also change colors, alter fonts, and use a variety of image filters to give you the effect that you’re going for. Most of these tools are fairly simple to figure out how to use, as they rely on drag and drop, basic menus, and other intuitive forms of control. In fact, if you’re familiar with most computer programs, you should be able to use Canva without much difficultly. To learn more about the specifics of each design tool offered on Canva, use the site’s guide here.
When you’re done with your graphic you can share it directly through Facebook, Twitter or email, or download it to your computer as a .jpg, .png, or .pdf file, depending on your needs. Canva also allows you to share your work on-site, allowing others to see your graphics and to give you feedback.
Still need more help in understanding how to use Canva? For a more in-depth look at how to use the features of Canva, check out the site’s helpful tutorials, which cover everything from the basics to teaching you some advanced design skills.
Using Canva in Your Course
And now the most important issue: how you can actually use Canva in your online course. Here are some ideas for embracing the technology Canva offers and stepping up your image game. Please feel free to share your own in the comments.
Give your course a makeover. Adding fun and engaging graphics can be a great way to freshen up your course, whether you add a simple title image, a visual representation of course information in an infographic, or just some helpful PDFs to assist students in understanding key concepts.
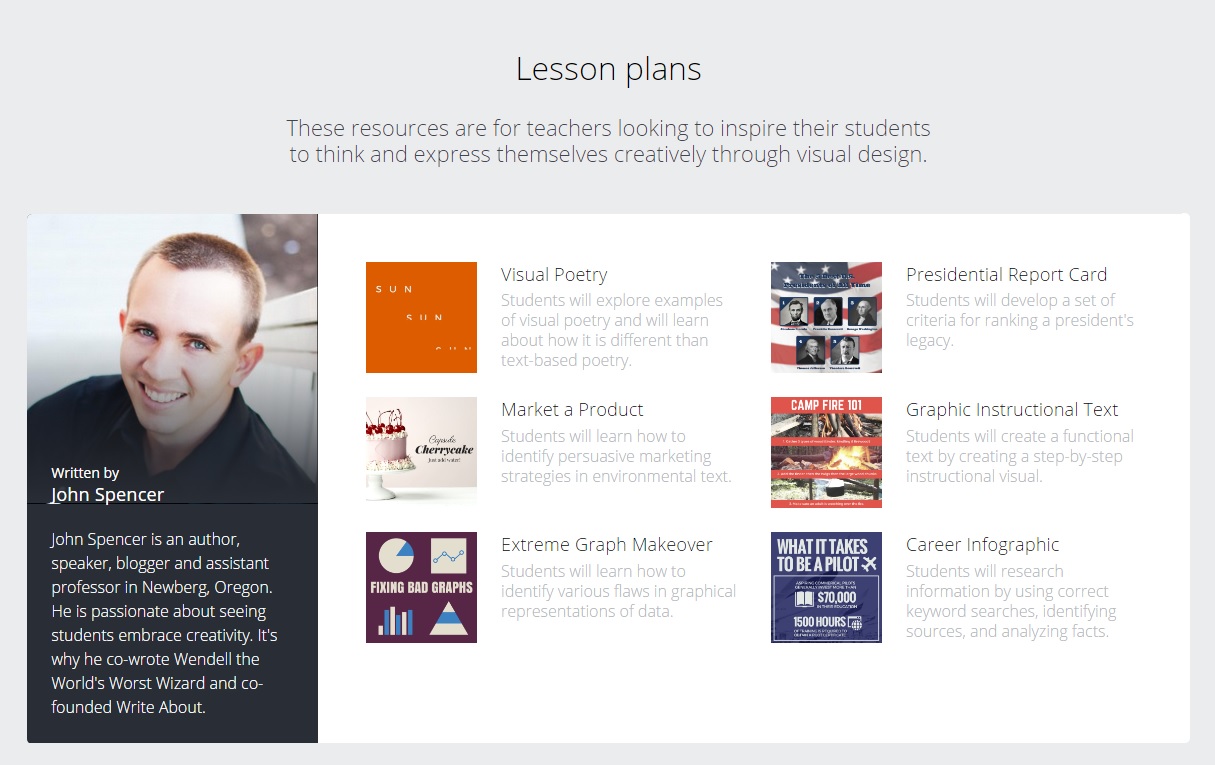
Use Canva as part of a course assignment. Using Canva as part of your course doesn’t have to just mean making graphics on your own. You can also encourage students to make images using the site as part of an assignment or project. Not sure where to start? You’re in luck–Canva has dozens of lesson plans and workshops for instructors to use, created by others working in K-12 and higher education. Check out the archive of teaching materials here.
Make an infographic of course content. Infographics are huge right now and not entirely without reason as they make it easy to digest large amounts of information. Making an infographic from scratch can feel daunting, but it doesn’t have to be. You can use a specialized tool like Piktochart (which we’ll cover in future post) but Canva also works well to this end and can help you to create infographics complete with diagrams, charts, graphs and loads of important information.
Integrate social media into your course. If social media, whether Twitter, Instagram, blog posts or Facebook, plays a role in your course, Canva can be an extremely useful tool. You can easily create visuals that are appropriately sized for almost any social site, and in most cases, share them with students with a single click straight out of Canva. With visuals vastly improving engagement on social media, this can be a great way to get students clicking.
Still have questions about Canva? Stop by Learning Technologies and we can help you get started.