What Is Alt Text?
Alt or alternate text is an HTML attribute added to an image (it lives within the IMG tag and appears here, bolded for emphasis <img src=’image location” alt=””>). Alt text serves a couple of different purposes:
- It helps search engines properly understand and index images.
- It is displayed in the place of an image if a file cannot be loaded.
- It allows those with screen readers to understand the content of an on-screen image.
Essentially, alt text allows those who can’t “see” an image in the traditional sense, whether because they’re automated web bots, have technical issues, or are visually impaired, to understand what’s going on. This makes it a very important part of online accessibility and actually one of the easier ways you can work to make your course more ADA-compliant.
It can also be useful to think of alt text from a universal design perspective. While we are aiming at making sure students using screen readers can access the images, alt text can also make the visual content of your courses more accessible to other students. Those who have slower internet connections where images won’t load quickly (or at all) or those with cognitive disabilities who need fewer visual distractions and need to turn off images are just a couple of examples of where alt text can help you embrace that ideal of universal design.
When Do I Need Alt Text?
It’s important to remember that not every image will need alt text information, though it never hurts to add it. If you only have enough time to focus on the important stuff, however, you need to look for images that convey information that is not available elsewhere on the page. Graphs, charts, diagrams, and other data visualizations will ALWAYS need alt text. Images that represent important concepts in your course may also need alt text. When in doubt, always err on the side of adding text.
To simplify the idea, however, it can be useful to divide images into two categories: decorative and informative. Decorative images are those that are used largely for aesthetic purposes. While they might contain information, as all images do, it’s not pertinent to understanding the course content. Informative images on the other hand contain visual information that is essential to the function of the course. How can you tell the difference? Removing a decorative image would make little difference in how a webpage would function. It might not look as nice, but the function of it would be the same. Informative images are those that cannot be removed without changing functionality. Without those images, concepts wouldn’t be as clear and navigation would be difficult. Informative images ALWAYS need alt text.
Useful Guidelines
- Try to avoid having text in images as much as possible. Sometimes it just won’t be possible to avoid having text in an image. But if you can, render as much text in HTML as possible. It ensures that everything will be accessible without any additional effort.
- Don’t forget the little stuff. It’s easy to forget that icons, often used as stand-ins for text, also need to be accessible. Your visually impaired students can’t see a PDF, email, or navigation icon. If you’re adding these, make sure to add alt text, too.
- Infographics are a class all their own. You will need to provide a text alternative if you plan to use an infographic or other text-heavy form of data representation. There’s too much data for either alt text or a caption to cover.
What Should Alt Text Say?
There are four criteria that all alt text should meet:
- Accurate and equivalent. Alt text should accurately describe what’s in the image and do so in a way that creates an equal opportunity for learning as seeing the image.
- Simple. Alt text shouldn’t be full of frilly language and purple prose. In most cases a few words or sentences should suffice. If the image necessitates more description, move this information to a caption that all students can see and limit your alt text to the absolute basics.
- Don’t use the phrases “image of” or “picture of.” Alt text can only apply to images, so this information is unnecessary and clutters things up.
- Not redundant. Don’t repeat information you already have in the text.
How long or short alt text will need to be will depend a lot on context. It will be up to your discretion to decide how much alt text to include. Here’s an example:

Depending on what kind of course you’re teaching and how much detail a student needs to know about this image, your alt text could vary. If the image is just to demonstrate Egyptian style art, you could go as simply as saying “Egyptian Carving on Temple.” But if you need students to understand what this image is more specifically, as part of the course, then you will need to be much more specific. Then the alt text could be something more like “Sobek, crocodile-headed Egyptian god, carved in bas-relief on a Kom-Ombo Temple column.” A good guideline, however, is that when in doubt, always err on the side of including more information rather than less.
How Do I Create Alt Text?
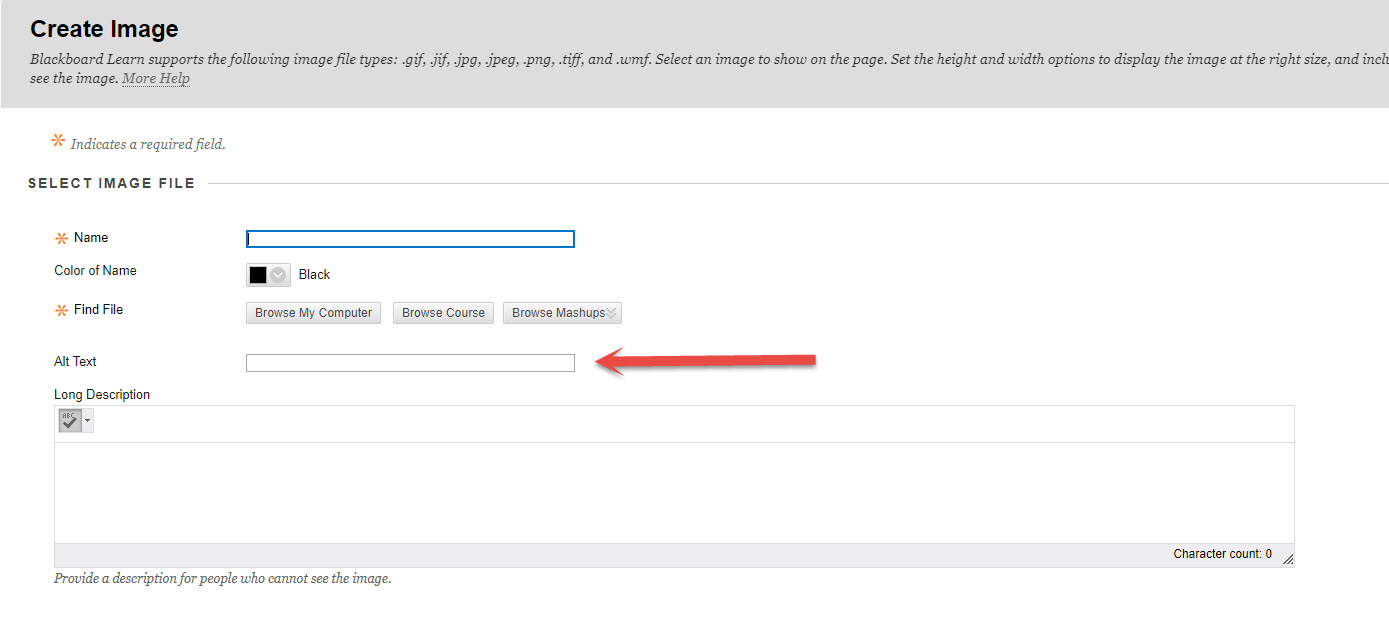
It couldn’t be easier to add alt text to an image in Blackboard. You can do it right from the content builder under Image. Once on this page, you simply upload your image and you can input any alt text in the labeled space below. Blackboard also provides space for long descriptions, which you might need in some cases when alt text wouldn’t be sufficient to really describe what’s going on. The long description is essentially a caption, and will appear below the image in your course. You can see the alt text for an image in Blackboard, or on any website, by hovering your cursor over it.
But what if you have an image that is already uploaded to Blackboard and you want to add alt text? You will need to enter the edit mode for the module the image is in, right click on the image and select “Image.” Then, you’ll be able to add both alt text and descriptions.

If you’re simply adding images to something in HTML (perhaps on a blog), you will want to input the alt text within the img tag. The standard HTML image tag is <img src=””>. Alt text is added by modifying the image source tag with the attribute. It looks like this: <img src=”image.jpg” alt=”description of image”>. You can also use the attribute longdesc if you need to add a longer description. Learn more about the img tag in HTML here.
Learn More
Keep learning about using web accessibility best practices like alt text from these sites:
- WebAIM: Alt Text
- Moz: Alt Text (NO LONGER OPERATIONAL)
- Accessible U: Alt Text
As always, please call or visit us in Learning Technologies if you have any questions or need assistance. We are happy to help!
