No matter what kind of course you’re teaching or how you’re teaching it (online, in-person, VCM), the College requires that you post your syllabus in Blackboard. In fact, even if you use Blackboard for absolutely nothing else the entire term, your syllabus still has to be uploaded there for students to access.
Every term instructors may run into issues with syllabi not extracting properly due to a range of issues. When this happens, a notification is sent out from the division office and the syllabus has to be fixed, resubmitted, and re-extracted.
Here, we’ll explain the proper process for creating, naming, and uploading your syllabus so that it extracts correctly the first time, every time.
What Is Extraction and Why Does It Sometimes Fail?
The College’s Information Technology Department has set up an automated process that extracts and saves all course syllabi from Blackboard. This process is called ‘extraction’ and it’s run every term to ensure that all courses have syllabi in them.
Generally, this program works smoothly, but if your syllabus is not posted using the correct naming conventions or using the correct process, your syllabus will not be able to extract properly. We’ll explain more below.
Creating Your Syllabus
We recommend using Word to create your syllabus. This file format (.docx) is preferred for accessibility reasons, however the .pdf file format will also be accepted.
Naming your syllabus is one of the most important parts of the process so make sure you follow these guidelines:
- When saving your syllabus, make sure to include the word ‘Syllabus’ in the file name (i.e. Course1100_Syllabus_Term22.docx).
- Do not include spaces, periods or special characters in the file name. You may use underscores as seen in the example.
- Save or Export a copy of your syllabus in a place where you can easily locate it (i.e. Desktop).
Your syllabus must follow these naming conventions or it will not extract correctly.
Posting Your Syllabus
Once your syllabus is created and named according to the guidelines above, it’s time to post it to Blackboard.
First, log into Blackboard and navigate to your course shell. Ensure Edit Mode is set to ON.
You’ll then want to follow the steps listed below to ensure your syllabus uploads properly:
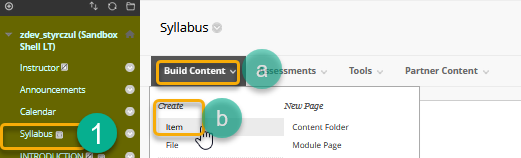
- Begin by clicking on the Syllabus Course Menu (do not change the name of the Syllabus link in the Course Menu).
- Click on the down-pointing arrow next to Build Content
- Select Item from the Create section
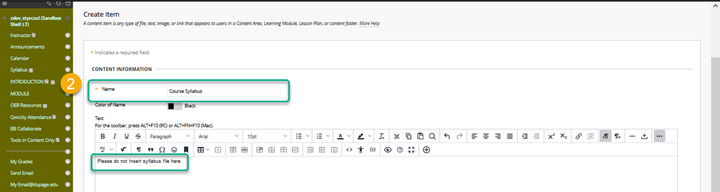
- Then, provide the Name for the Content Item. The word ‘Syllabus’ must be in the Name field (i.e. Course Syllabus). Be sure not to use any special characters in the Content Item Name.

- Next, you will upload your syllabus as an attachment. In the Attachments section, click Browse Local Files. Navigate to and select the syllabus file you saved on your computer then click Open. If you accidentally attached the wrong file or need to attach a different file, select Do not attach and repeat the steps. Also, make sure that the syllabus file is the only file attached to this content item.

- Ensure the ‘Permit Users to View this Content’ option is set to ‘Yes’.
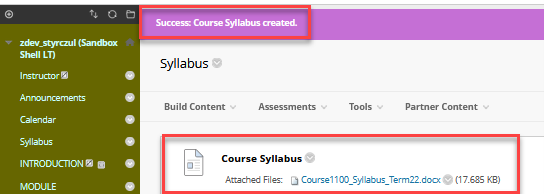
- Click Submit. You should see a banner that the Content Item (i.e. ‘Course Syllabus’) has been successfully created.
And that’s it! If you follow these guidelines and steps, your syllabus should extract correctly.
If you have any questions about this process or can’t figure out why your syllabus isn’t extracting properly, please send us an email at learningtech@cod.edu and we’ll be happy to assist you!
